
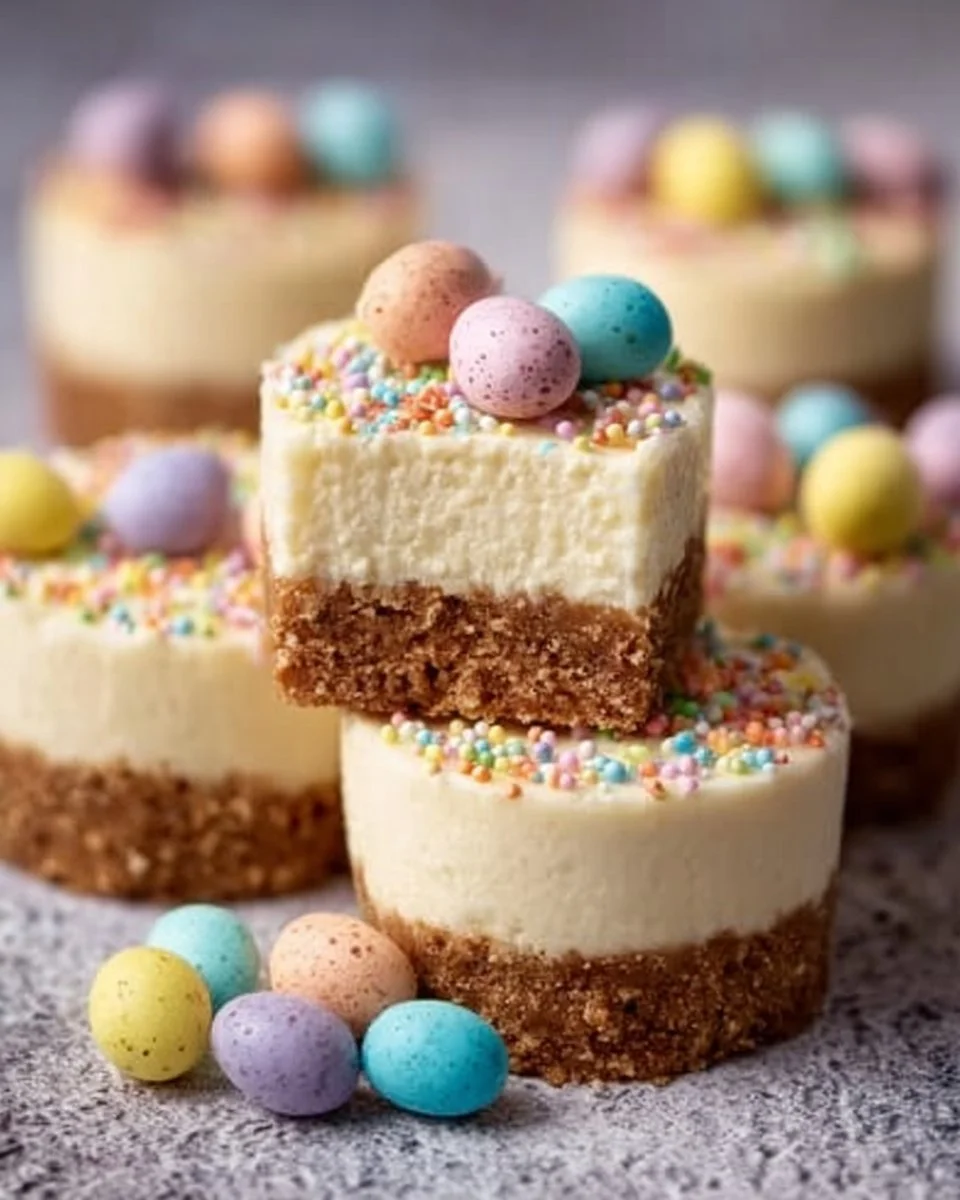
There’s something truly special about a dessert that combines simplicity and elegance, and these Easter No-Bake Mini Cheesecakes hit that sweet spot every time. Each bite offers a luscious creaminess, balanced with a buttery graham cracker crust and delightful pastel toppings that make them just as pleasing to the eyes as they are to the palate. I find myself making these little gems for family gatherings, especially during Easter, when the festive spirit is in full bloom!
Preparing these cheesecakes comes together surprisingly fast, making them an excellent choice for busy celebration days. You can whip them up ahead of time and spend your day enjoying the company of friends and family rather than being stuck in the kitchen. If by some miracle you have leftovers, they can easily be stored and enjoyed well into the week!
Why I Love Easter No-Bake Mini Cheesecakes
Easter No-Bake Mini Cheesecakes are an incredibly easy and undeniably delicious treat that never fails to impress my guests! The creamy filling paired with the crunchy crust is a match made in dessert heaven. Plus, you can customize the toppings based on your mood or holiday theme, making these cheesecakes the true winner at my table!
Easter No-Bake Mini Cheesecakes Ingredients
The magic of this cheesecake truly lies in the harmonious blend of a few simple ingredients that come together to create something extraordinary. Don’t worry about exact measurements just yet; those are all in the recipe card for you!
Essential Components
- 1 ½ CUPS GRAHAM CRACKER CRUMBS: These are the stars of our crust, providing that wonderful crunchy texture!
- ¼ CUP UNSALTED BUTTER, MELTED: This will bind the crumbs and give the crust its rich, buttery flavor.
- 1 TBSP GRANULATED SUGAR: Just a pinch of sweetness to enhance the crust’s flavor.
- 12 OZ CREAM CHEESE, SOFTENED: This is the creamy base that defines our cheesecake and gives it that lovely smooth texture.
- ½ CUP POWDERED SUGAR: Adds sweetness and helps create that fluffy filling.
- 1 TSP VANILLA EXTRACT: A dash of vanilla for aromatic depth and warmth!
- 1 CUP HEAVY WHIPPING CREAM: Whipped to light and airy perfection, making our filling delightful and fluffy.
- PASTEL-COLORED CANDY MELTS: For that whimsical Easter touch, transforming each mini cheesecake.
- MINI CHOCOLATE EGGS OR JELLY BEANS: The perfect little decorations that not only look cute but add a delightful surprise!
- EASTER-THEMED OR PASTEL SPRINKLES: As a final flourish, sprinkles bring joy and color!
Substitutions and Tips
Need a swap? If you’re looking to change things up, here are some alternatives:
- Instead of GRAHAM CRACKER CRUMBS, you could use crushed vanilla wafers for a different flavor profile.
- LIGHT CREAM CHEESE can be used instead of regular for a lighter version, though it won’t be quite as rich.
- You can replace HEAVY WHIPPING CREAM with COCONUT CREAM for a non-dairy version that still brings that lovely lusciousness.
- Want a flavor twist? Consider adding a splash of lemon juice into the filling for a zesty kick!
Kitchen Tools You’ll Need
- 12-cup muffin tin (with liners)
- Medium mixing bowl
- Hand mixer or stand mixer
- Spatula
- Whisk
- Microwave-safe bowl (for melting candy melts)
- Spoon or piping bag (for filling)
How to Make Easter No-Bake Mini Cheesecakes
Let’s dive into creating this delightful Easter No-Bake Mini Cheesecakes. I’ve broken down the process into simple steps. Follow along, and you’ll have a delicious treat ready in no time. We’re aiming for mini cheesecakes that are creamy, beautiful, and a definite crowd-pleaser!
Prepare the Base
First, grab a medium bowl and mix together 1 ½ cups of graham cracker crumbs, ¼ cup melted butter, and 1 tablespoon granulated sugar until the mixture resembles wet sand. This is key to making sure your crust holds its shape perfectly.
Press into Muffin Tin
Now, press 1 to 2 tablespoons of the crumb mixture into the bottom of each lined cup in your muffin tin. Firmly pack the crumbs using the back of a spoon—you’re creating a solid base for all that creamy filling!
Chill the Crust
Once you’ve pressed down the crumbs, place the muffin tin in the refrigerator while you prepare the filling. This helps the crust firm up, making handling a breeze later.
Beat the Cream Cheese
In a mixing bowl, take 12 oz of softened cream cheese and beat it until it’s smooth and creamy—this will be the foundation of your cheesecake filling. No lumps should remain; we want it perfectly velvety!
Add Sugar and Vanilla
Next, add ½ cup of powdered sugar and 1 teaspoon vanilla extract to the cream cheese. Mix until completely combined and smooth—this will give your filling that sweet and flavorful kick!
Whip the Cream
In a separate bowl, whip 1 cup of heavy cream until stiff peaks form. This step is vital; the cream must hold its shape when the beaters are lifted, introducing that light texture we adore.
Fold in the Whipped Cream
Gently fold the whipped cream into the cream cheese mixture using a spatula. This is where you want to be delicate; we’re maintaining that airy goodness that makes the cheesecake so light and delightful!
Fill the Crusts
Now it’s time to assemble! Spoon or pipe the filling evenly over the chilled crusts, and smooth the tops with a spatula for a neat, finished look. Isn’t it beautiful already?
Refrigerate to Set
Place the filled muffin tin back in the refrigerator and chill for at least 2 hours or until the filling is firm. This waiting game allows all those flavors to meld beautifully.
Melt the Candy Melts
While you’re patiently waiting, melt your pastel-colored candy melts according to package instructions. Stir until smooth and free of lumps—this will add a delightful drizzle on top of your cheesecakes!
Drizzle Over Cheesecakes
Now, grab a spoon or fork and have fun drizzling the melted candy over the top of each cheesecake in playful pastel designs. It’s a simple step, but it really elevates the presentation!
Add Toppings
Finally, top each cheesecake with mini chocolate eggs, jelly beans, and a sprinkle of festive sprinkles for that eye-catching finish. Look at those cheerful colors—just perfect for Easter!
How to Store Easter No-Bake Mini Cheesecakes
If you have any leftovers (which is a big IF!), these mini cheesecakes store beautifully. You can leave them in the refrigerator in an airtight container for up to 3-4 days. If you want to enjoy them a bit later, they can be frozen for up to 2-3 months—just thaw them in the fridge overnight before serving. There’s no need to worry about reheating; they’re best enjoyed chilled!
Tips for Success
- Make sure your cream cheese is at room temperature for a smooth filling.
- Be gentle when folding in the whipped cream to maintain its airy texture.
- Use a piping bag for a more elegant filling technique.
- Keep an eye on your whipped cream to avoid overmixing, which can lead to a grainy texture.
- Have fun with the toppings – this is your creative time!
- Store any leftovers covered to keep them fresh and tasty.
Serving Suggestions
- Serve with fresh berries on the side for a fruity complement.
- Pair with a light sparkling lemonade for a refreshing drink.
- Top with a dollop of whipped cream for an extra indulgence!
- Present them on a colorful platter to enhance their festive vibe.
- Enjoy them alongside a cup of coffee or tea for a perfect after-dinner treat.
Let me know if you give these Easter No-Bake Mini Cheesecakes a try! I promise they’ll bring a smile to everyone’s face. Happy baking!
Leave a Comment